Sunday 12 December 2010

a little update


Well i haven't managed to get much on here for a few months, but the car finally passed the IVA test and within 2 weeks we finally had a registration number, so out onto the open road it went, in the 6 or so weeks the car was registered before it was sorned for the winter we managed to rack up about 1800 miles, and touch wood, every thing seemed to go very well.

the first few thousand miles have been pretty gentle on the car so far, mainly just making sure every thing settles in well, and that nothing has worked it way lose or wants to drop off.

ear plugs have become the must tho i have to admit whilst out in the car, as the exhaust is a little on the noisy side. during high revs it sounds good, but at steady cruising speed it becomes pretty droning and boomy. this may need some attention!

the car is currently tucked away for the winter period and due a few winter upgrades, which i will hopefully get on here as they get on the car, but apart from that a good clean is in order ready for plenty of use next year.

Thursday 23 September 2010

Sunday 12 September 2010

What sundays are for......


well i have had it sat in the shed for 6 months, and i thought it was about time that now it has passed the IVA that i should fit the carbon dash, i knew this wasnt going to be an easy task but with the car going for inspection tomorrow it left me with one day to get it all done.
but i am pleased to say it was well worth the effort.

IVA done and dusted and DVLA

So my last post was a little short and sweet, but at long last i have passed the IVA, after rectifying my few little problems, phoned them up on tuesday after the bank holiday and was told i could bring the car in on the friday.
So friday comes round, and this time the car was driven up to the test station, i drove it up there, and dad drove it back. Now i have come to the conclusion that it is most definitely not a car to be driving if you don't want attention.
After a very conservative drive up the motorway we arrived in good time, and was only at the test station for 30min, after testing the emission this time it passed with flying colours, now running at 0.19% CO, instead of the 11% it was pumping out last time. so heading home with an IVA cert every thing was finally coming together.

So on the monday after the IVA, the paperwork for registration was taken to my local office, they took it in and told me they would be in contact, so on thursday a phone call came asking me to bring the car in for inspection on monday, and after this we should finally have a reg.... fingers crossed.

Friday 3 September 2010

Tuesday 24 August 2010

Specification and work run down

Engine:
1994 Mazda Eunos 1800cc
Standard bore
15mm shortened sump and oil pick up
new big end shells
new oil seals sump
full new piston ring set
.09mm total head and block skim to bring back to tolerance
full de-coke of pistons and combustion chamber
full new genuine mazda head gasket set
new inlet / exhaust valve stem seals
reground valves
new spark plugs / leads
rocker cover gasket
block painted satin black
new water pump
new cam belt
all related tensioners
cam shaft seals
modified 2 1/2 inch polished alloy intake with ITG cone filter
MAF sensor relocated
Adjustable fuel pressure regulator

Transmission:
Standard mazda 1800 manual gearbox
new clutch release bearing
new clutch slave cylinder
2L 75/90 fully synthetic transmission fluid
new prop shaft seal
new gear shaft oil and associated gaskets
Baily Morris shortened prop shaft
Torsen LSD differential

Cooling:
one off alloy fabricated radiator
full coolant re-route
silicone hoses with alloy pipe work
after market rad fan switch
5 year advance pink coolant
standard mazda cooling fan

braking:
AP racing split master cylinder
dot 4 fluid
Goodrich braided brake hoses
EBC Green stuff pads
CRN grooved discs (front)
Standard discs (rear)
Mazda calipers and hand brake system

Electrical:
Mazda loom
with the following removed:-
air con
power steering
headlamp motor controls
electric windows
speakers
auido system
heating controls
heater motor
standard mazda ECU

Interior:
Carbon mods dash
Trilogy Savage blue illuminated switches
Revolution gauges:
Speedo
Rev counter with shift lights
fuel
temperature
oil pressure
Momo 290mm steering wheel
Westfield 4 point harnesses

Exterior:
Post office red ZK body work
V8 bonnet
black mesh vents
Carbon mods cycle wings
Carbon Mods rear arch protection
Caterham font indicator pods with clear lenses
Carbon rear light upgrade inc reverse and fog
Hella Thinlite high level brake light
Team Dynamics 1.2 pro race 15" wheels in satin black
Toyo T1R 195/50/15

Saturday 14 August 2010

Saturday 31 July 2010

Sorting out the emissions

After failing the IVA, with the car back home it was time to get to the bottom of why the emissions are so high, turns out after little bit of research and a test gauge, it turns out the fuel pressure regulator has packed up, the fuel pressure in the rail should be 35 - 40 psi, but it is currently running at 65 psi.

a new pressure reg has been ordered, so here is hoping that this cures my problem,

Friday 30 July 2010

IVA test day!


So tuesday the 27th was the big day, after about a 4 week wait from sending off my paper work it was time to head to the test station, the car was taken to Birmingham VOSA, i had booked an AM appointment, should there be any problems i might have allowed me time to rectify any problems there and then if possible.

To save the hassle of driving the car up to the test station, i managed to borrow a van and trailer off a friend of mine, i didnt want to have any problems on the way up there and not be able to make my appointment. the car was loaded up the night before and at 6 am that morning we headed off to the test center, we were going to arrive mega early so a steady drive was taken up there. the test center was very easy to find, it was even well sign posted off the motorway.

Once we arrived at the test center, the car was unloaded out side, and the opportunity was taken to give the car a warm up around the the industrial estate, and my god did it sound good, roaring down the little road with high industrial units for the sound to echo around, barking at passers by.

with the car now nicely warmed up it was time to head into the test station, as i headed round the building and parked up waiting for the tester to arrive.

My testers name was Paul, he was very polite and explained every thing that he was doing during the test.

test took about 2 hours to complete including a break, every thing seemed to go well,
every thing was checked over for projections, sharp edges, etc, the car was put onto the ramps and checked every thing underneath, he commented on how tidy the installation was, and how every thing was very neat and tidy. the speedo was checked for true speed indication, and we then moved onto the brake test, where every thing was good.
afterwards it was time to go outside to give the car a test run, make sure the mirrors were all in order and steering self centered, after this it was onto the noise test, to which the car stuck out 95db so just within the limit at the 3/4 engine power, but on the overrun the pop of the exhaust took this 104db, but he over looked that.

once that had been completed the test was over and he went in to do some weight calculations for the braking and issue me with the fail certificate.

Double bogs dollocks!

Paul had informed me during the emissions test the the car was running a little on the rich side, as the car had produced 11.2% on the co2 emissions, where the tested limit is 3.5%. seems we might still have a slight over fulling issue......

Apart from that the car sailed through with no problems, so it was back into the trailer and we headed for home, disappointed in one way, but happy in others.

Remember when going to the IVA test, the best way to think is, expect to fail, and a pass is a bonus.

Sunday 4 July 2010

a couple of bad points


Not every thing has gone so well, unfortunately a few weeks ago when fitting the side repeaters, one of the cycle wings has shattered on the gel coat around one of the bolts, i have no idea how this happened as the bolt wasn't even tightened up.
this mean the carbon cycle wings will have to come sooner now.

Another problem that needs to be sorted is that the fuel tank is leaking from one of the welds, which goes to show that westfield cannot properly pressure check the fuel tanks for leaks, i am going to try and fix this myself, as i am really not in the mood for removing the fuel tank at this moment in the build, and i have a few tricks to try and fix it with out the need to remove it, just need to pin point the exact location of the leak first.

Saturday 3 July 2010

Car is now progressing well....


things have been busy, and have not found much time to do any blogging so i suppose i best catch up on where things have been going......

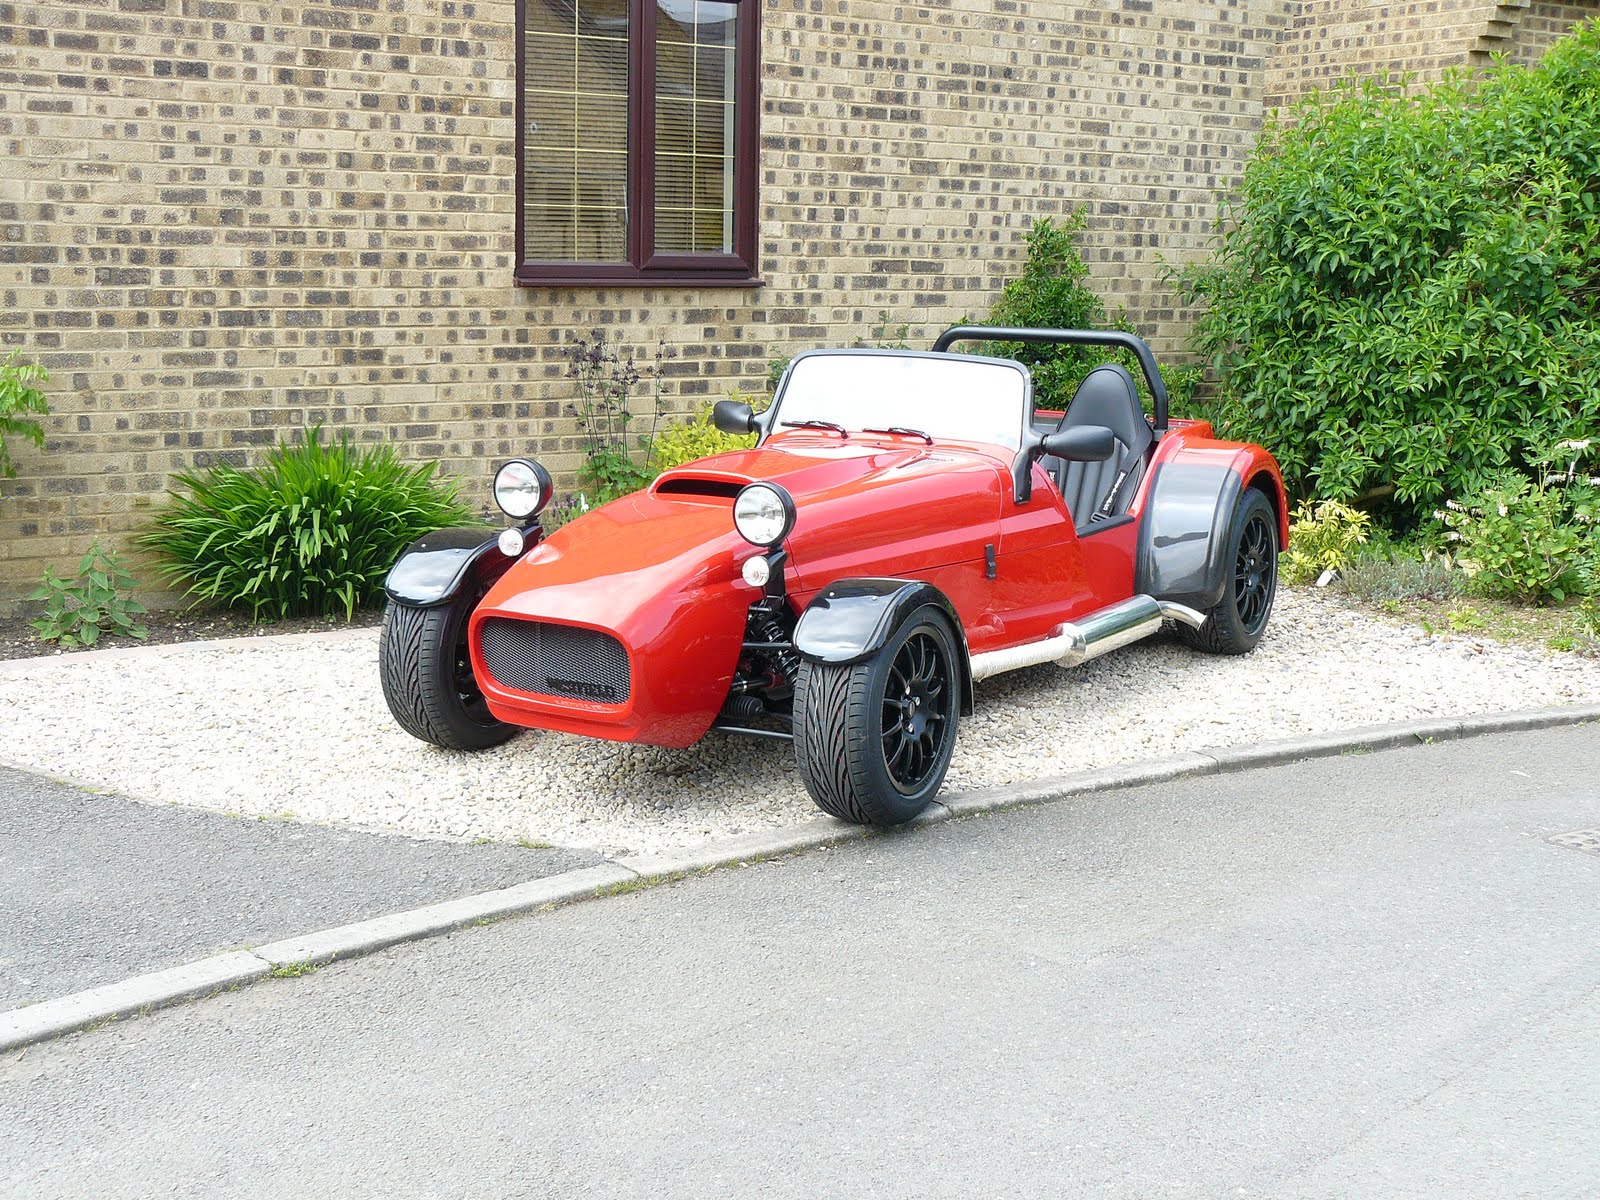
in my last update the car was finally moved from the workshop to the great outdoors where it got to see day light for the first time as a complete car, and i have to say i felt like it has given birth and become a proud father.

now with the car finally out the shed a few little more odd jobs were able to be sorted, the main one being able to correctly do the tracking using a gunsons drive over trackrite. this has been set to currently toe out to aid the self centering of the steering, and once the car has passed the IVA it will set up to its correctly alignment.

with the car now outside temptation took over and it wasn't very long before we found the car going for its first drive under its own steam just down the road and back. yes this was a big moment but it was over shadowed by the fact that some where on the ECU i had a bad connection that was causing the car to run rough every time i moved the ECU and unless it was in a certain position the engine wouldn't even run, during these issue the ECU kept throwing up a fault code to do with MAF sensor, so this was replaced ( altho it turns out the fault didn't actually lay with the MAF sensor the original one was dead any way )
trying to diagnose the fault took a little while but i eventually tracked this down to bad connection on the earth for the MAF sensor where it plugs into the ECU, so after a lot of swearing this issue was finally overcome. which then moves me onto the next problem....

After getting the engine to run correctly it was time to give the car a little shake down on a private stretch of road, every thing was taken very gently to begin with, but there was one big issue, it appeared that the engine was suffering heavily with air locks, which was not allowing the cooling system to work at all. now to aid problems with this, my temperature gauge gave completely the wrong readings, every time the engine was run after a few min the gauge would go off the scale, with no real way of telling what temperature the engine was actually running i have had to wait to get my hands on a laser temperature sensor.
after a bit of head scratching and some trial and error trying different ways to jack the car up and fill the cooling system up, last week i remade the blanking plate the covers my original thermostat housing, but this time with the addition of small threaded hole and a dowty washer which enabled me to jack up the front of the car, this in turn allows the head to be fully bleed and removes all the air from the system which had been causing me all the problems.

also today i fitted some ally panels to provide some ducting of the heat that is given off when the fan kicks in to stop the air intake sucking in loads of hot air.

other jobs that have also been completed....

Side repeaters have now been fitted to the front cycle wings to comply with the new IVA regs, now these were supplied by westfield, but in a fetching shade of chrome, these really did look out of place on the car, so with a little rub down and a can of satin black paint, these where given a much better look.

IVA caps have now been fitted to most of the parts that need to be covered for the IVA test, all the front suspension bolts etc etc along with some inside of the car.

Brakes - now this is a very interesting section that seems to high up on the much asked questions on the WSCC forum, how to bleed them correctly procedure?
After my initial fill up and bleed of the brakes it turns out there were rubbish, and i had managed to get a lot of air into the system leaving me with a very spongy pedal.
after another bleed it seemed that they were getting no better, so off the forum and have a look through the much asked questions and theory's on how to do this, now one post caught my eye which said that you needed to take the calipers off the mounts and try to get the bleed nipples higher than the pipe work that feeds them, so with this info in had i set about whipping them off and giving it a go...
now during this attempt to bleed the brakes with the calipers higher up, straight away this time i was able to notice loads of tiny bubbles being pushed out, so all the calipers were done in this manner and i have to report that so far the brakes are feeling so much better, the pedal is still not as hard as i think it should be, but at the moment i am not to worried as i fitted a new set of grooved discs, which these are yet to be bedded in.

Coolant re-route 1800 engine in a westfield

a lot of people have gone on about the poor cooling of the mx5 engine when fitted into the westfield chassis, the biggest issue is now due to fact the the westfield does not have a heater, now this causes problems because when the engine was in the MX5, mazda relied on the heater matrix to provide cooling for the rear of the cylinder block. now the heater matrix has been taken away there is nothing to provide adequate cooling for the rear of the block, as now the water is returned straight from the back of the cylinder head and fed back into the lower water pump inlet completely missing the radiator, and because the thermostat sits right above the water pump the majority of the water just gets pumped directly back up and out the thermostat to the rad, and not actually supplying any cooled water to the back of the cylinder block.

So to cure this problem the solution is to move the thermostat from the front of the cylinder head to the back of the head (this was its original position in the MX6)

to do this you will need the following,

Thermostat cover from an 1800
Thermostat cover from a 1600
1 1/4 aluminum pipe work
2 90 degree silicone bends
1 dog leg silicone bend
1 90 degree mx5 specific silicone bend
(the above were designed by Mark on the forum)
m16 bolt - to fit the 1600 thermostat cover thread
lots of jubilee clips

the pictures below show how the assemble the above parts to move the coolant flow from back to front. the thermostat itself has now be relocated to the back of the cylinder head, which now has the 1600 thermostat cover fitted to it. the bolt fitted is to block off where the 1600 engine has it temperature sensor fitted, on my engine i have relocated my temp sensor to a tapped bolt hole just to the right hand side of the new thermostat cover, all i did was remove the bolt and screwed the temp sensor in with a new sealing washer.
then the first pipe you see is the MX5 specific pipe which bring it to the right angle to start running the ally pipe work towards the rad.
Now in the picture you can see that i have relocated and fitted an after market fan switch into this pipe, now i have done this because my ECU for some reason has decided to no longer operate the original fan switch.
next pipe is the dog leg silicone hose, this then fits to the top hose on the rad after another section of ally pipe work.
you will then need to take off the original water pump inlet fitting and all the associated pipe work with it, and replace all of this with the original 1800 thermostat cover from the front of the head. this will the allow you to take the 2 90 degree silicone hoses and with the aid of a small section of ally pipe work get this pointing towards the bottom hose of the rad. now this small section of pipe work has had 2 pieces of pipe welded to it, one is for the feed from the header tank, the other is for the feed back from the idle control valve, now the idle control valve feed originally connected to the thermostat housing on the front of the engine,but this has now been blocked up.
The original outlet on the head has had a blanking plate make up and fitted, now if you want you can actually remove this fitting all together, but you will need to remove the cams pulleys in order to do this, now seeing as i have already had this engine apart many times, i left this in position for the moment. now one key element to this plate that it is worth noting, is that i have fitted a small M5 screw into the front of this, now this is to enable you to bleed the cylinder head correctly when filling the water system back up, as after the past few weeks i have discovered that the head is prone to air locks if this is not done, and has now actually cured my cooling / air lock issues that i have been having.


Tuesday 25 May 2010

Smile for the camera

Now that the car is out of the shed, dad couldn't resist taking a few pictures


Now that the car is out of the shed, dad couldn't resist taking a few pictures

A westfield is born.......

So over the past few weeks much tinkering has been done, and this weekend is the biggest moment to date was set upon, getting the Westfield out of the shed!

Now since the build was started every one who has visited has always asked the same question?
'how are you going to get it out of here?'

Well the answer to that question is - Remove the wall that sits between the two !

SO with a hammer/ big screwdriver / and a saw it was time to demolish the wall!!


and with a little squeeze and a make shift set of ramps.....................

The car finally gets to see day light for the very first time as a whole car!

Wednesday 12 May 2010

I can almost taste it now ...............


Just a couple of pics to show that is very nearly finished!

Saturday 1 May 2010

'Jobs to complete list' grows ever smaller.......


Time for a 4 day weekend, time to crack on with more jobs.........

First job on the list was to address a few minor problems with previous things that i had fitted to make sure i have them in the bag before the IVA.

First job was where the fuel lines come up the front bulk head, one of the lines was getting rather close when the clutch depressed, now there was a gap of about 5mm with the clutch fully depressed, but i thought it best if i try and gain some more room, so luckily i was able to move the mounts where i have secured the fuel lines from one side to the other, this needed one of the fuel lines bending a bit more to clear the clutch reservoir. with this done everything was re secured and i now have a small mile between the clutch and the pipe.

whilst i was working on the fuel lines, there was a couple of places where they ran very close to welds/corners of the chassis underneath. a small amount of tweaking was done to bend the pipes away from these trouble spots. also to make sure they cannot question how close they are during the IVA some rubber pipe has been cable tied around them just to avoid any risk of touching.

another area that needed some attention was the steering shafts. the problem was where the lower shaft fixed into the UJ that attaches to the steering rack i was running very close to the chassis rail, the steering shafts have not been welded concentric to each other meaning that they get a fair old wobble on when turning. this was leaving such a minimal gap, time to dig out the drill and move the support bracket over slightly, this will then help to move the shaft away from the chassis rail.
now when i moved the support bracket it became very close to the inlet support brace on the engine, meaning that if the engine was to move under hard acceleration it may clash with the bracket. so i made a small relief in the engine brace to clear the bracket.

now that i have address a few small problems it was then onwards with the building, to finish of the interior was then the main mission, so today i fitted the central carpet which was all secured into place, with the small addition of a memento from the MX5 added to remember what the car is based upon.

with that all done all that was needed was to fit the harnesses for the final time and bolt them all up, and then fit the seats for which i hope will be the final time.

Wednesday 28 April 2010

Still alive and have not set fire to it....yet!


Been a while since my last update, but again things have still been moving forward.

Coolant re-route:- Things have been moved on with this, all parts have now been sourced and the last parts are arriving tomorrow, there parts are custom made silicone hoses that have been designed by some one else on the WSCC forum.
One of the biggest problems was the lack of cooling capacity from the standard supplied radiator, so to over come this problem i have manufactured my own 'all alloy' one, with a much more efficient rad core, this one has more rows and is 50mm thick as apposed to the 35mm of the polo rad. this should be more than enough to keep the engine cool, and will also be efficient enough for when the car is turbo charged later in its life.

Cooling fan not working - after a lot of head scratching and looking at wiring diagrams i was unable to come to a conclusion as to why this doesnt work, the fan is ECU controlled so unless there is a problem with the ECU i cannot work it out. so to get round this i am going to add an electric fan switch purchased from CBS and use this to override the mazda's fan control. this will be incorporated into the re-route pipe work. set to come on the standard temp of 97 degrees, i have used one of the relays i fitted under the dash to operate it.

Engine running very rich - now when i have previously run the engine, it has been running very rich kicking out large amounts of black soot and running bad on idle, after reading a few forums the issue pointed to a choice of 2 options - a faulty coolant temp sensor, or a vacuum leak.
now after trying to work out why the cooling fan wasn't working i knew that the coolant temp switch works fine. which lead to me believe that the problem lays with a vacuum leak.
Now after a lot of searching, and head scratching, a light bulb come on and i remembered that when i rebuilt the engine i wasn't very happy with how well the fuel injector seals were sealing to the inlet manifold. so a new set of these were ordered and fitted, so once the cooling is back together i shall see if this cures the running issue.

new wheels - these arrived on monday and were very promptly fitted to the car, and i think they look amazing in the matt black finish. one small issue is that the toyo's 'Rim protection' on the side wall of the front tyres is making contact with the front mud guard bracket, but this will be 'adjusted' out of the way.

Carpets in - all carpets have now been fully fitted apart from the central tunnel which is in need of a bit of sewing to attach the leather gaiter of the hand brake to it, but once that is secured this will also be fitted.

Seats and harnesses are also now ready to be finally installed once the tunnel carpet is in.

Stoneligh Kit car show on sunday, lets hope the weather stays nice and i am sure my wallet will not stay in my pocket for very long, ( already eyed up my next carbon fiber purchase ) but will also be purchasing a lot of 'finishing' parts, such a various trims etc....

Monday 5 April 2010

The Good, The Bad, and The Not Working...

So things have moved on a little this week over the easter weekend, so far the temporary dash has been finished off, the vinyl has worked very well now all the dials and switches have been installed, and all for under £20, as long as it passes the IVA it will be well wort it.

Now for the bad...... after running the engine over the past few weekends i have been keeping a close eye on the cooling when its been running, and it certainly seems that the engine is not cooling very well at all. now after reading into a few other peoples build and blogs a lot of them have resorted to re-routing the coolant on the mazda engine, this involves moving the outlet of the coolant from the front of the head to back. now i will make a new section on how to do this once i have done it, i will make sure it covers in detail all the parts and how you go about doing this on a 1800cc engine,

and the not working, Now during the above and running the engine up to temperature it appears that the cooling fan is not cutting in when the temp gets high, now after many hours of wiring diagrams and tracing wires, it seems i cannot yet find a reason for this not to work, now my only concern is that during the removal of the air condition wiring, i might have removed a wire that i shouldn't have, now the air con use to over ride the cooling fan to be used in conjunction with the AC condenser fan when the AC is switched on, so i will be trying to get this to work which ever way i can.

Tuesday 30 March 2010

The end is becoming near....... Well maybe!?


Now for a little further update on the past weeks work,

After successfully starting and running the engine in my last post, i am pleased to say that it wasn't a one off, the engine has run 7 or 8 times more since, mainly to check for leaks in the fuel and cooling system, which so far every thing has seemed to hold its fluids, but the most important thing is that there is still no sign of water appearing from around the head gasket (breaths a big sigh of relief) since running it a few more times the HLAs have gone a lot quieter after filling back up with oil. all thats left to do now with the engine is just check the timing when i can get my hands on a timing light.

Now after reading Complete kit car magazine this month there was an article on a guy that had taken his car for IVA and had failed on a few points, one of them was concerning some thing that effected me!

Now in my earlier posts right at the start of the build, i wrote about the fact that westfield has not welded the bracket to my chassis where the T piece for the brake light switch is fitted, now after speaking to 'Westfield Technical' they said that it would be fine to fir a riv nut into the chassis to attach this, so i did as they said.
But it turns out after reading the section in the mag, this was one of the points he had failed on with his car. So to get round this it needs to be properly bolted to chassis rail with visible threads passing through it. so this was promptly changed at the weekend, luckily it was spotted in the magazine other wise we would have become stuck on this point when we went for IVA. )Good spot dad!!)

As things are now starting to come together nicely, i am starting at the back of the car and working forward making sure every thing is finished, and getting all the little jobs sorted out.
So to finish off the back end, the crud catchers have been fitted into the rear wheels arches, the speed sensor has been located facing the drive shaft nuts on a small bracket and the wire run along the tunnel.

next job was to fit the new high level brake light to the roll bar, in the end i purchased a Hella Thinlite, this comes in at only 10mm thick and makes for a very unintrusive fit on the back of the bar, the wire for the light has been run through inside the bar and down underneath the rear boot cover, i had previously placed a wire from the main rear loom to power the high level brake light already.
Once this had been done it then meant that the rear boot cover and roll bar could be fitted for hopefully the final time! see picture above.

the IVA spec dash is now ready to be covered with vinyl and fitted to the car.

The issue with the wiper wiring has now been sorted out, this was down to some iffy instructions from westfield with regards how to wire up the motor.

there are some little bits left to do with the wiring, but that should be sorted out over the easter weekend, which i hope to spend it all working on the car with a big push to complete the final parts.

Steering wheel arrived today, after much debate over size and what to go for, i left the choice to my dad, to which i have to say he managed to make a great choice, and went for a 280mm MOMO wheel. pics to follow soon...

New wheels have also been ordered, i have stuck to tradition and gone for some Team Dynamic 1.2s but in a matt black finish, 15 inch running 195/50/15 Toyo T1R tyres, now it turns out that i think i need to thank westfield for a bit of a muck up on their part with the front mud guards, when i went to collect the chassis i asked for black fenders, but in true westfield tradition when i turned up it had red ones, and that they didnt have any black ones in stock, but after phone call i was told that they did have some black ones, but they were meant to be going on a race series car, but after a little chat they said i could have those, now it wasn't till last weekend when i was measuring up for the wheels did i notice the width of these fenders, they measure 240mm internal width and make the current 185 tyres look lost. meaning that i should have any issues running my 195 tyres and an ET35 offset with the new wheels.

Tuesday 23 March 2010

Steering all fitted

Now in one of my earlier posts i wrote about westfield making my steering column to short, and not willing to send me a spline to sort the job out myself,

well i am now pleased to say that i have fully working steering column.

to get round the issue a spline was ordered from car builder solutions, and after a trip to work the UJ that wesfield fitted incorrectly was soon cut off and in its place was welded a standard spline section, which now fits into the lower shaft perfectly, also by doing this myself i was able to make sure every thing measured up perfectly.

once it has been all welded up i had the upper and lower shafte properly painted in black Kephos, and not that crap paint that just flaked off that westfield had done.

Sunday 21 March 2010